
Beads are fun to play with, whether you are making jewelry, home decor or some other kind of craft. Artbeads recently discovered the art of making miniature chairs with beads thanks to Noreen M, an Artbeads.com customer. Noreen has made many beaded chairs over the years and now her goal is to revive miniature beaded chair art by sharing the instructions and diagrams she has spent hours and hours creating. Here is Noreen’s story on how she got started making these cute little chairs:
In the 1950s, when I was a child, my mother made miniature chairs about 3 inches tall using seed beads and thin wire. I still own a few chairs and a sofa she made. There’s no way of knowing how she learned to make them, but my guess is she found instructions in a crafting magazine. She used to buy magazines with instructions for crochet and embroidery items and I remember many, many issues of McCall’s magazine. I still remember cutting out the Betsy McCall paper dolls out of every issue. My grandmother did a lot of crafts, so it’s possible my mom found instructions in a magazine that was published before the 50s.
After making many beaded bracelets and necklaces, I looked at my mom’s beaded chairs and thought it would be fun to give it a try. But, I had no instructions. I love a challenge. I love puzzles. And, what a challenge it would be to solve the little beaded puzzles. I made a drawing of one of her chairs. Then I tried to duplicate the drawing using a continuous line. After working on it for hours, starting over and over, I gave up and went to bed. The next morning, I woke up and my brain instantly resumed working on the puzzle. I laid there imagining where I left off the previous night, when all of a sudden I realized that at one point I needed to go in a different direction. I jumped out of bed, grabbed my puzzle and bam! I was right!!
Using the drawing, over 4 feet of continuous wire and about 500 beads, I successfully completed my first chair…I’ve made many chairs, given them to friends and enjoyed the smiles of surprise. Two of my friends are now making chairs and one of them is going to teach the art to her daughter.
Today on the Artbeads blog, we are sharing Noreen’s instructions and diagrams with you, so you can start making these chairs for yourself. They make wonderful accents in doll houses and would even look cute in a fairy garden. Use the instructions below to get started!
Chair 1 Instructions
Materials Needed:
25 Large 6/0 Beads
592 Small 11/0 Seed Beads
4 feet of 26 gauge stainless steel wire
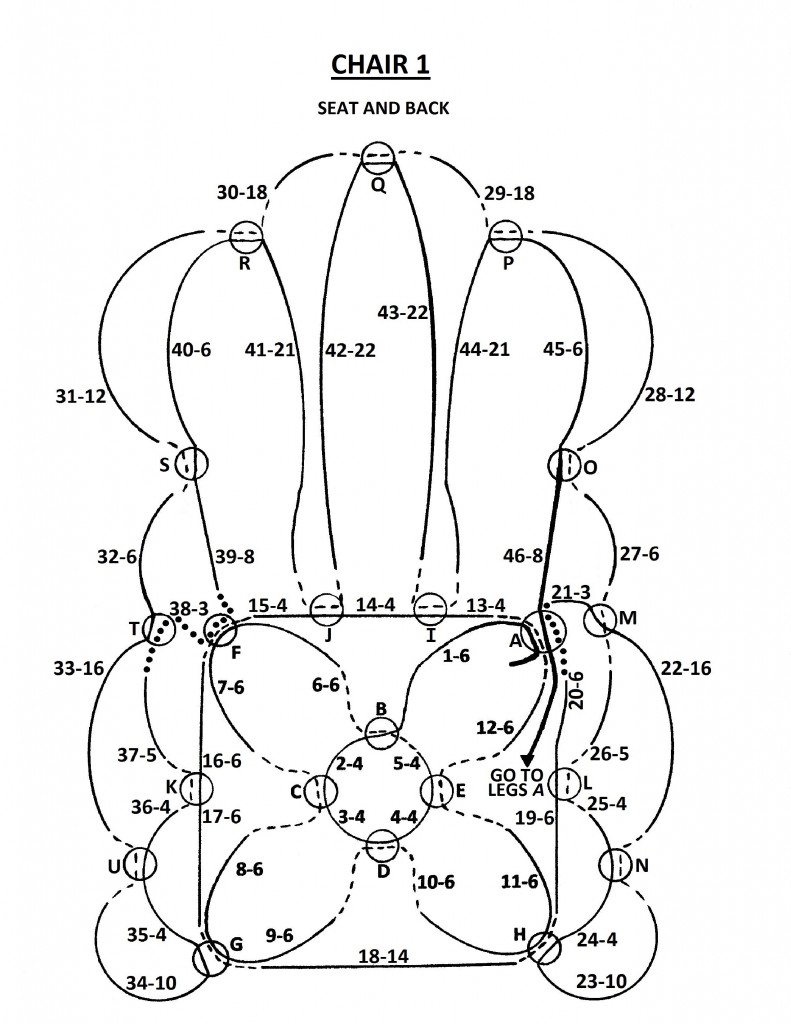
Refer to the Chair 1 Diagram to complete the design. On the diagram, large beads are marked with a letter. It is important to enter and exit large beads as shown.
Steps are indicated on the diagram by a number followed by a second number, which indicates the number of small beads used in that step. Example: 1-6 on the diagram means, “Step One – Add 6 small beads to the wire.”
Note: The first bead to be added to the wire is referred to as “large bead A”. The wire will pass through this bead five times. Therefore, it is wise to text the bead you choose. Cut five short pieces of wire (1-1 1/2″ will do). Put all five pieces of wire through the bead hole. If they are tight or don’t fit, pick another bead to start with.
To make the seat of the chair:
About a half of an inch from one end of the wire, make a small curl or simple loop to keep your beads from falling off. At the other end of the wire, begin adding beads. Add large bead A. Then, follow these steps:
Step 1: add 6 small beads (referred to as small). Add large bead B.
Step 2: Add 4 small. Add large bead C.
Step 3: Add 4 small. Add large bead D.
Step 4: Add 4 small. Add large bead E.
Step 5: Add 4 small. Go through large bead B. The beads from step 1 and large bead A will now hang loose until you get to step 12.
Step 6: Add 6 small. Add large bead F.
Step 7: Add 6 small. Go through large bead C.
Step 8: Add 6 small. Add large bead G.
Step 9: Add 6 small. Go through large bead D.
Step 10: Add 6 small. Add large bead H.
Step 11: Add 6 small. Go through large bead E.
Step 12: Add 6 small. Go through large bead A.
Step 13: Add 4 small. Add large bead I.
Step 14: Add 4 small. Add large bead J.
Step 15: Add 4 small. Go through large bead H.
Step 16: Add 6 small. Add large bead K.
Step 17: Add 6 small. Go through large bead G.
Step 18: Add 14 small. Go through large bead H.
Step 19: Add 6 small. Add large bead L.
Step 20: Add six small. Go through large bead A.
To make the back and arms of the chair:
Note: Before proceeding, make sure you are holding the chair in the same direction as the diagram shows. If you don’t pay attention, you might end up with the seat of the chair upside down, which will cause problems in future steps.
Step 1: Add 3 small. Add large bead M.
Step 2: Add 16 small. Add large bead N.
Step 3: Add 10 small. Go through large bead H.
Step 4: Add 4 small. Go through large bead N.
Step 5: Add 4 small. Go through large bead L.
Step 6: Add 5 small. Go through large bead M.
Step 7: Add 6 small. Add large bead O.
Step 8: Add 12 small. Add large bead P.
Step 9: Add 18 small. Add large bead Q.
Step 10: Add 18 small. Add large bead R.
Step 11: Add 12 small. Add large bead S.
Step 12: Add 6 small. Add large bead T.
Step 13: Add 16 small. Add large bead U.
Step 14: Add 10 small. Go through large bead G.
Step 15: Add 4 small. Go through large bead U.
Step 16: Add 4 small. Go through large bead K.
Step 17: Add 5 small. Go through large bead T.
Step 18: Add 3 small. Go through large bead F.
Step 19: Add 8 small. Go through large bead S.
Step 20: Add 6 small. Go through large bead R.
Step 21: Add 21 small. Go through large bead P.
Step 22: Add 22 small. Go through large bead Q.
Step 23: Add 22 small. Go through large bead I.
Step 24: Add 21 small. Go through large bead P.
Step 25: Add 6 small. Go through large bead O.
Step 26: Add 8 small.
Now you can loosen your original stopper loop by large bead A. Bring the end of the wire through to the underside of large bead A to create the legs.
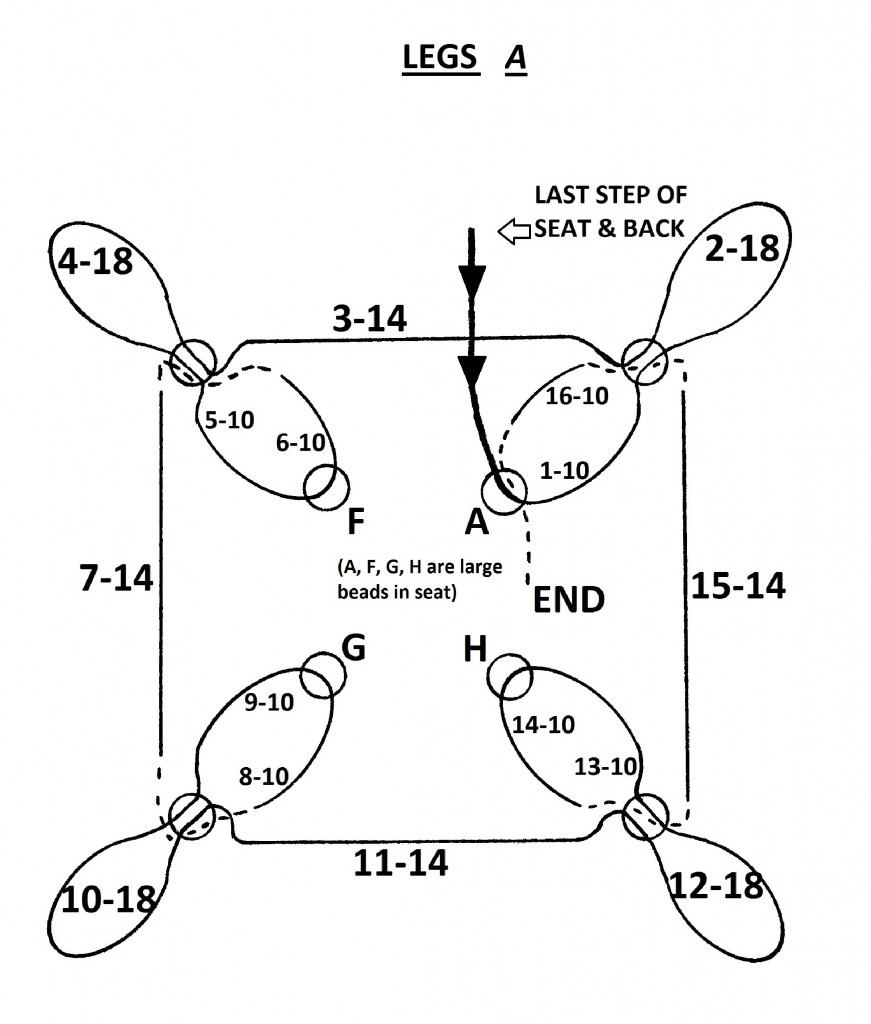
To make the legs of the chair:
Refer to the diagram for Legs A to complete these steps.
Step 1: Add 10 small. Add a large bead
Step 2: Add 18 small. Go through the last large bead added.
Step 3: Add 14 small. Add a large bead.
Step 4: Add 18 small. Go through the last large bead added.
Step 5: Add 10 small. Go through large bead F, which was added while making the seat.
Step 6: Add 10 small. Go through the large bead added in step 4.
Step 7: Add 14 small. Add a large bead.
Step 8: Add 10 small. Go through large bead G in the seat.
Step 9: Add 10 small. Go through the large bead added in step 7.
Step 10: Add 18 small. Go through the large bead added in step 7.
Step 11: Add 14 small. Add a large bead.
Step 12: Add 18 small. Go through the last large bead added.
Step 13: Add 10 small. Go through large bead H in the seat.
Step 14: Add 10 small. Go through the large bead added in step 11.
Step 15: Add 14 small. Go through the large bead that was added in step 1.
Step 16: Add 10 small. Go through large bead A in the seat. If you find it difficult to bring the end of the wire through the bead because the end is bent out of shape, trim the end. This will make it easier to pass it through the bead.
To finish your chair, trim the end of the wire, leaving only a couple of inches. Straighten the loop at the other end of the wire. Pull tightly on both ends of the wire and twist the two ends together using needle nose pliers. Trim the twisted wire, leaving approximately 1/4 of an inch. Bend the wire end under large bead A to hide it.
If you want to make another style of beaded chair, try the one below!
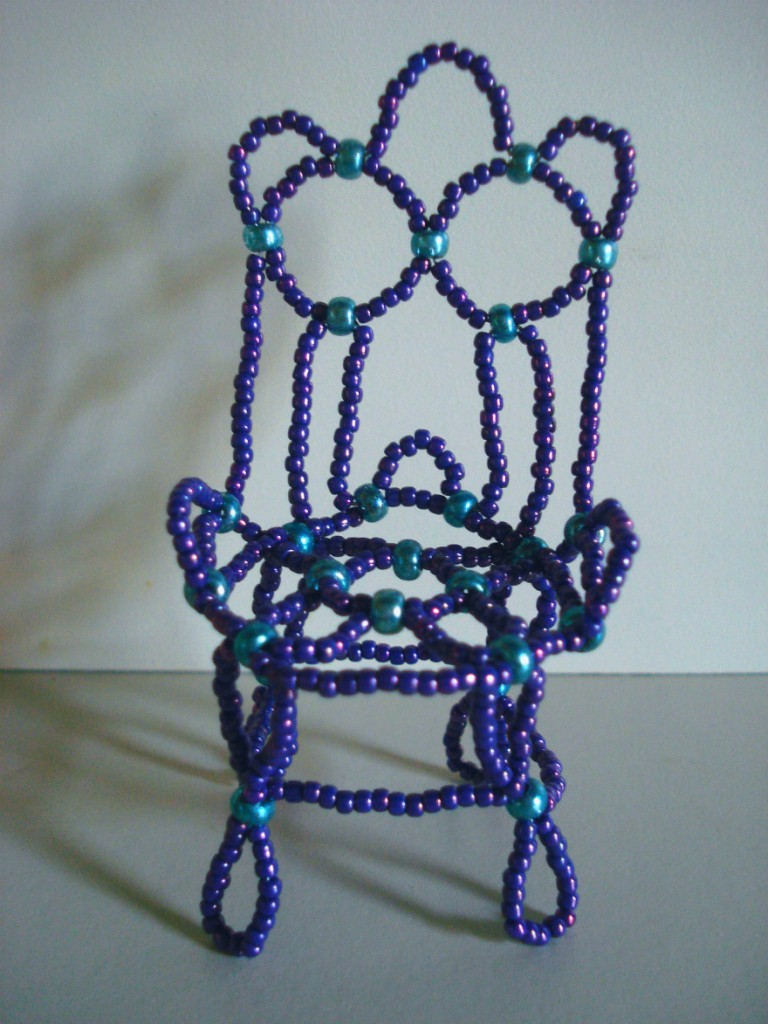
Chair 2 Instructions
Materials Needed:
25 large 6/0 beads
553 Small 11/0 seed beads
3 feet and 9 inches of 26 gauge stainless steel wire
Wire Cutters
Needle-Nose Pliers
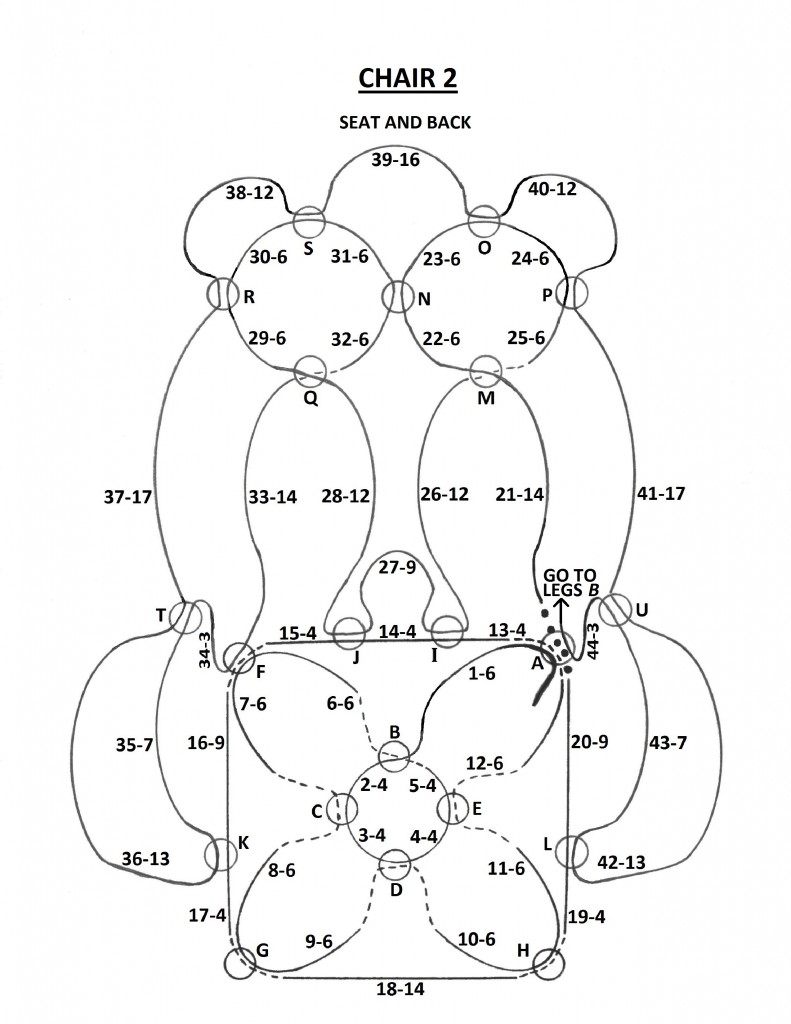
To make the seat of the chair:
About a half of an inch from one end of the wire, make a small curl or simple loop to keep your beads from falling off. At the other end of the wire, begin adding beads. Add large bead A. Then, follow these steps:
Step 1: add 6 small. Add large bead B.
Step 2: add 4 small. Add large bead C.
Step 3: Add 4 small. Add large bead D.
Step 4: Add 4 small. Add large bead E.
Step 5: Add 4 small. Go through large bead B. The beads added in step 1 and large bead A will now hang loose until you complete step 12.
Step 6: Add 6 small. Add large bead F.
Step 7: Add 6 small. Go through large bead C.
Step 8: Add 6 small. Add large bead G.
Step 9: Add 6 small. Go through large bead D.
Step 10: Add 6 small. Add large bead H.
Step 11: Add 6 small. Go through large bead E.
Step 12: Add 6 small. Go through large bead A.
Step 13: Add 4 small. Add large bead I.
Step 14: Add 4 small. Add large bead J.
Step 15: Add 4 small. Go through large bead F.
Step 16: Add 9 small. Add large bead K.
Step 17: Add 4 small. Go through large bead G.
Step 18: Add 14 small. Go through large bead H.
Step 19: Add 4 small. Add large bead L.
Step 20: Add 9 small. Go through large bead A.
To make the back and arms of the chair:
Note: Before proceeding, make sure you are holding the chair in the same direction as the diagram shows. If you don’t pay attention, you might end up with the seat of the chair upside down, which will cause problems in future steps.
Step 21: Add 14 small. Add large bead M.
Step 22: Add 6 small. Add large bead N.
Step 23: Add 6 small. Add large bead O.
Step 24: Add 6 small. Add large bead P.
Step 25: Add 6 small. Go through large bead M.
Step 26: Add 12 small. Go through large bead I.
Step 27: Add 9 small. Go through large bead J.
Step 28: Add 12 small. Add large bead Q.
Step 29: Add 6 small. Add large bead R.
Step 30: Add 6 small. Add large bead S.
Step 31: Add 6 small. Go through large bead N.
Step 32: Add 6 small. Go through large bead Q.
Step 33: Add 14 small. Go through large bead F.
Step 34: Add 3 small. Add large bead T.
Step 35: Add 7 small. Go through large bead K.
Step 36: Add 13 small. Go through large bead T.
Step 37: Add 17 small. Go through large bead R.
Step 38: Add 12 small. Go through large bead S.
Step 39: Add 16 small. Go through large bead O.
Step 40: Add 12 small. Go through large bead P.
Step 41: Add 17 small. Add large bead U.
Step 42: Add 13 small. Go through large bead L.
Step 43: Add 7 small. Go through large bead U.
Step 44: Add 3 small.
Now you can loosen your original stopper loop by large bead A. Bring the end of the wire through to the underside of large bead A to create the legs.
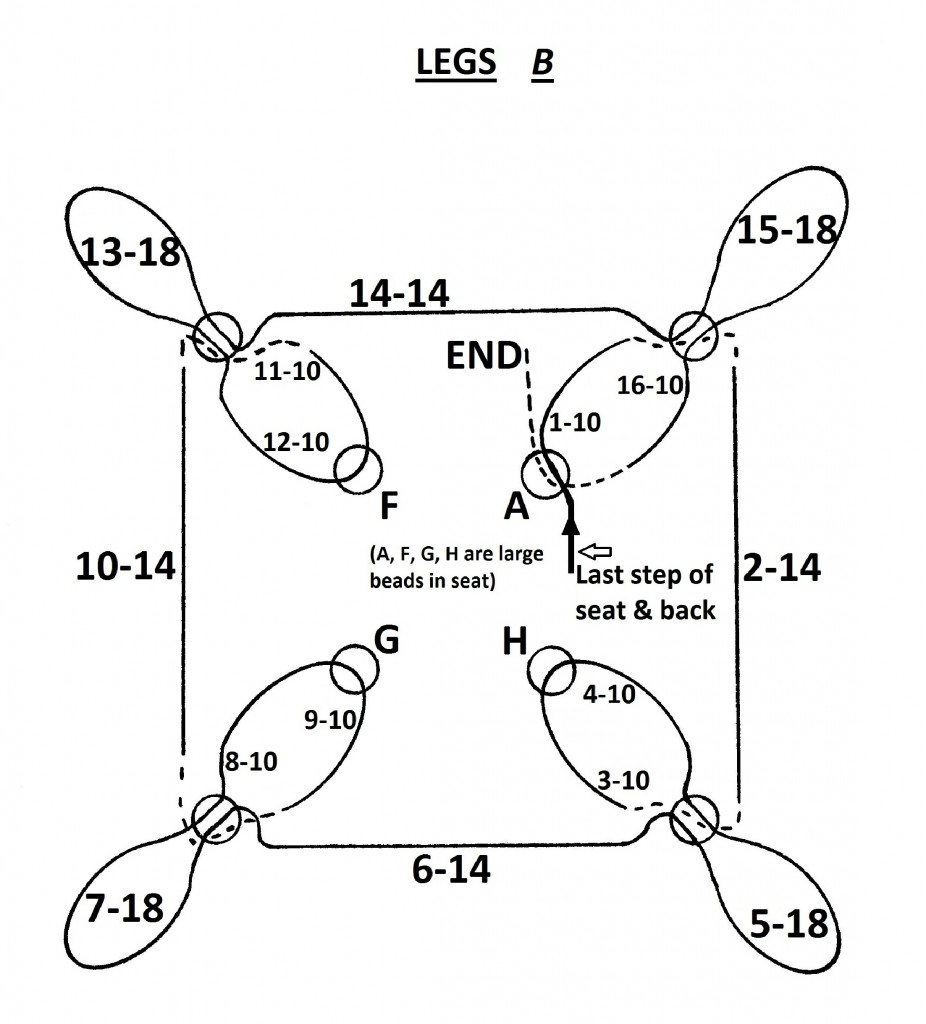
To make the legs of the chair:
Refer to the diagram for Legs B to complete these steps.
Step 1: Add 10 small. Add a large bead.
Step 2: Add 14 small. Add a large bead.
Step 3: Add 10 small. Go through large bead H in the chair seat.
Step 4: Add 10 small. Go through the large bead added in step 2.
Step 5: Add 18 small. Go through the large bead added in step 2.
Step 6: Add 14 small. Add a large bead.
Step 7: Add 18 small. Go through the last large bead added.
Step 8: Add 10 small. Go through large bead G in the seat.
Step 9: Add 10 small. Go through the large bead added in step 6.
Step 10: Add 14 small. Add a large bead.
Step 11: Add 10 small. Go through large bead F in the seat.
Step 12: Add 10 small. Go through the large bead added in step 10.
Step 13: Add 18 small. Go through the large bead added in step 10.
Step 14: Add 14 small. Go through the large bead added in step 1.
Step 15: Add 18 small. Go through the large bead added in step 1.
Step 16: Add 10 small. Go through large bead A in the seat. If you find it difficult to bring the end of the wire through the bead because the end is bent out of shape, trim the end. This will make it easier to pass it through the bead.
To finish your chair, trim the end of the wire, leaving only a couple of inches. Straighten the loop at the other end of the wire. Pull tightly on both ends of the wire and twist the two ends together using needle nose pliers. Trim the twisted wire, leaving approximately 1/4 of an inch. Bend the wire end under large bead A to hide it.
These are just two examples of the patterns for beaded chairs Noreen wants to share with the world. You can find even more pictures, diagrams, instructions and tips on her website: minibeadedchairs.myfreesites.net. She even has instructions for making beaded sofas and ottomans!
Finally, we leave you with some more tips for making these beaded chairs and other miniature furniture:
Wire Tips:
Stainless steel wire is the best choice for these chairs, as it is sturdy and offers good support. Beading wire is too soft to support your project and will cause the chair to be floppy. Brass wire will break if you get a bad kink or when twisting ends together. If you use colored or coated wire, the coating comes off as you are working with it.
Our wire straightening tool is very helpful when making beaded chairs, as kinks can develop in the wire while working with it.
Bead Tips:
A bead mat is very helpful, as it ensures your beads don’t roll around while working.
An 8g package of size 11/0 beads contains approximately 850 beads, plenty to create one chair.
Noreen prefers using TOHO seed beads for her chairs. Miyuki also makes 11/0 round seed beads. Try not to mix the two brands, as sizing could vary slightly between brands.
You can try Czech glass beads that are the same size as 6/0 beads, just make sure to check the hole size. You can use Czech glass beads on your chair in places where the wire passes through 3 times or less.
In any spot on any pattern where the wire only passes through the large bead twice, you can use size 8/0 seed beads. This can provide a more delicate look to your chair.
Chairs can be made smaller by reducing the number of beads used in each step of the diagrams. If you’d like a larger chair, Noreen doesn’t recommend increasing the number of beads, as this can cause the chair to be floppy. She has made larger chairs by using larger beads and 24 gauge wire.
When the chair is complete:
Your chair will need to be straightened and shaped by gently pulling on it. If you have a kink in a section of beaded wire which should be straight, you can lightly squeeze it with wooden kitchen tongs or between two popsicle sticks. Do not use metal tools for this, as they can easily break beads.
If you’ve made beaded chairs or have found another way to incorporate beads into your crafts, let us know in the comments below, or share a picture with us on our Facebook Page.
看看!
Just saw this. My mom, brother and I used to make beaded chairs to sell at the county fair. I have one and a rocking chair somewhere. I am going to try to make these with my granddaughters. They are very crafty. Should be fun! Brings back many good memories!!